This article will teach you how to disable Quick Heal Antivirus on Windows 10. It will also show you how to turn off its notifications and protect your webcam. This is an excellent guide to stop Quick Heal from infecting your PC with harmful viruses. It is essential to disable this antivirus as soon as possible. You should never trust it with sensitive information. It is best to remove it altogether unless you are sure that it is not doing any harm.
How To Disable Quick Heal Antivirus On Windows 10
The Quick Heal antivirus program protects your PC from malware attacks and prevents you from visiting malicious websites. It can be uninstalled or disabled permanently, but it still keeps some entries in the system. In order to remove Quick Heal completely from your system, you'll need to manually delete all Quick Heal entries from the registry or use a third-party tool. Here are some steps to do this.
The first step in uninstalling Quick Heal is to ensure that your Wi-Fi connection is secure. Wi-Fi networks often extend for more than 300 feet from the router, so securing the network will keep your data safe. Secondly, you can remove Quick Heal from your system's registry keys. If you do not want to delete the registry keys, you can use a third-party tool to remove them.
How To Disable Quick Heal Notification?
To disable the Quick Heal Antivirus notification on your phone, open the settings menu on your mobile device and go to the general tab. From here, you can enable the Block Uninstallation option. You should also enable the Restrict access to specific categories option if you want to prevent Quick Heal antivirus from lagging your phone. To enable the Block Uninstallation option, you will need to be logged in as a device administrator.
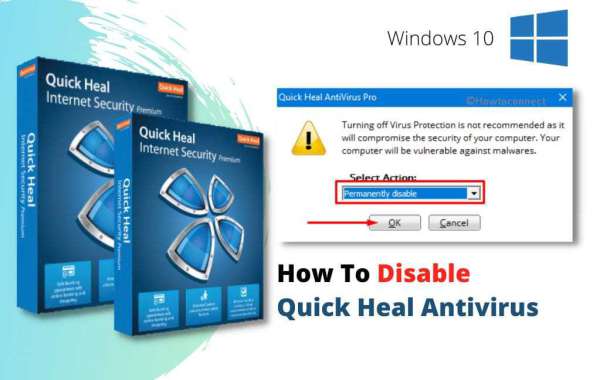
To temporarily disable the Quick Heal Antivirus notification, go to the taskbar and click on the Q-icon. Select the "Disable Virus Protection" option. After you click on this option, a dialog box will pop up asking you when you want to turn the protection back on automatically. You can click OK. To re-enable the Quick Heal Antivirus notification, follow the steps above.
How To Disable Quick Heal Webcam Protection?
When you Install Quick Heal Antivirus without CD Drive on your laptop or computer, you will notice the Webcam Protection option. This feature can be disabled with a simple click of a button. Regardless of what the reason is, you should be careful to choose a safe setting. Quick Heal can block malicious apps that use your webcam to spy on you. To disable Webcam Protection, click on the "disable" option, and then follow the on-screen instructions.
Before you can disable the webcam protection, you need to make sure that your antivirus program is not blocking your webcam. This will likely take a while, but you may be able to solve the problem by adding an exclusion for the camera. You can also run free antivirus software such as Restoro to check for Windows issues.